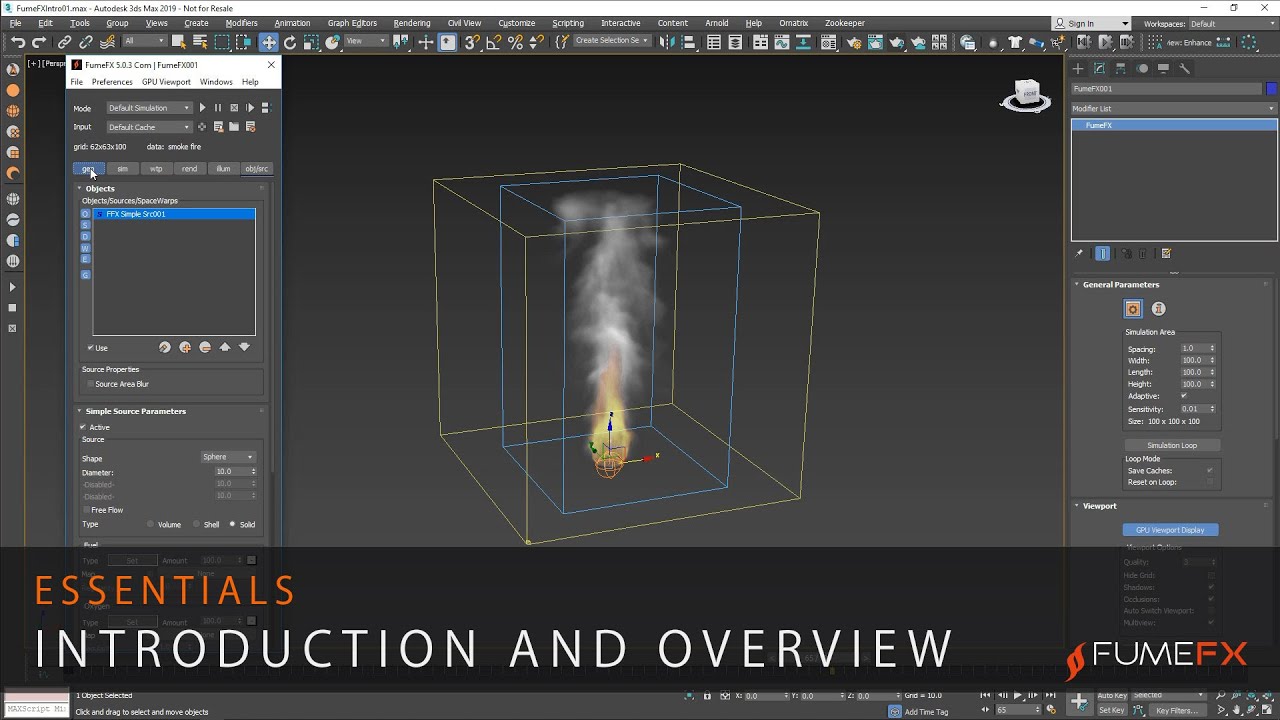
Okay, so, I wanted to mess around with some cool visual effects for a project I’m working on. I heard a lot about this thing called FumeFX, so I figured, why not give it a shot? It’s supposed to be awesome for creating, like, smoke, fire, and all sorts of crazy stuff you see in movies.
First things first, I had to get my hands on FumeFX. I got it installed – no big deal, pretty straightforward. Then came the fun part – figuring out how to actually use this thing. I opened up my 3D software, the one I always use, and started poking around.
I watched a bunch of tutorials online, just to get a basic idea of what I was doing. It seemed like everyone was creating these amazing simulations, and I wanted in on that action. The tutorials showed how to create a FumeFX container, which is basically the area where all the magic happens. You gotta define the size and the resolution, you know, the usual stuff.

Then, you add some sources. These are the things that emit the smoke or fire or whatever you’re going for. I started simple, just a basic emitter. I messed around with the settings, trying to figure out what each slider did. It was a lot of trial and error, let me tell you. Honestly, it felt like I was just randomly adjusting things half the time.
I tried creating some fire, but it looked more like a sad little campfire at first. The tutorials talked about adjusting the fuel, the temperature, and a whole bunch of other parameters. I was like, “What even is the difference, and where are the buttons?” It was a bit overwhelming, but I kept at it.
Slowly but surely, I started to get the hang of it. My fire started to look more like actual fire, which was pretty exciting. I played around with the simulation settings, things like gravity and turbulence. You can really change the behavior of the simulation by tweaking these things. It’s kind of like being a mad scientist, but with less actual science.
I also experimented with adding wind, using a helper object to push the fire in a certain direction. That was cool. It really added some movement and realism to the whole thing. I realized I can make the fire go wherever I want, which is neat!
After hours of tinkering, I finally created something I was kind of proud of. It wasn’t perfect, but it was a heck of a lot better than my first attempt. I had this fiery explosion thing going on, and it looked pretty darn cool if I do say so myself.
Here’s what I learned from this whole experience:
- Start small. Don’t try to create some epic masterpiece right away. Begin with a simple simulation and gradually add complexity.
- Watch tutorials. Seriously, there are tons of great resources out there. Learn from the pros. The buttons and settings are not self-explanatory, honestly.
- Experiment. Don’t be afraid to try new things. You never know what you might discover. Most of the time, the results won’t be good, but it’s okay.
- Be patient. FumeFX has a learning curve. It takes time to master. I would know because I spent so much time trying to figure things out.
So yeah, that’s my FumeFX journey so far. I’m still a beginner, but I’m excited to keep learning and see what else I can create. It’s a powerful tool, and I feel like I’ve only scratched the surface. There is still so much for me to learn, but at least I made some progress. If you’re into visual effects, I definitely recommend giving FumeFX a try. Just be prepared to put in some time and effort. And don’t expect to make crazy movie-level VFX overnight.


